Tuesday, April 23, 2013

IC Podcast challenge, April. Landspeeder Vengeance. And a Darkshroud.

Previously on "For The Limey"...  you'll remember that I built and magnetised (think I'm hungry, I almost typed baconised) two Darkshroud/Vengeance kits. This month I painted them, and I got them finished about this time last week too, so I'm already ahead of the game for my May/June/July commitments which are all Deathwing thanks to some batch airbrushing today.


Not much to tell on them really - I used the same techniques I used on the other Ravenwing models. Block in the metallics and reds then wash with the airbrush. The statuary bits were easy to paint.  Some codex grey, badab black and a fortress grey drybrush was applied to the stonework.  The bronze/gold sort of bits were a Balthasar Gold base (love that paint. It's so hot right now) with an Earthshade wash and a Shining Gold highlight. Easy. One of these days I'll get around to trying the Golden Brown metallic wash from Secret Weapon - this would have been perfect.  Ah hindsight, you mad thing.


As usual I used Mithril Silver and inks for the buttons.  Shiny! P3 CoaL Black for screens.


The stained glass was a second try success.  I originally went for a white/silver mix for the base with inks on the top but it looked like this. Which was crap. 


It didn't work as it suggested there was light on the inside making the colours of the glass stand out, which just wasn't working for me.  So I went over with white and got the Hawk Turquoise out and mixed with some other stuff that I just can't remember.  I couldn't reproduce it if I tried!  I'm happier with this. Sorry for the dark picture


I didn't paint the glass next to the pilot - it was too fiddly to get in there so it's just black. Meh. And then I did the rest of the work and clearcoated them and now they look like this. I look forward to playing with them!


My May commitment is just the new Belial model.  I cut his sandwich board off as I think it's rather impractical. See you next time. 


Friday, April 5, 2013

IC podcast - March! Nephilim and Dark Talon pt 3

It's been a month since I posted - blame it on my Dark Passenger.  Oh my god this new keyboard's awful.  It's like a chimpanzee trying to text with his lips.

So anyway, I got the Nephilim finished.  I actually finished about three weeks ago but I procrastinated on the postings until I got the Dark Talon finished and then it was all OH! SHINY! with X-Wing and a Dakkajet for WAAAGH! Hamish, and some gargoyles for Hive Fleet Limey (dead blog, don't go there).

I progressed through the usual painting that I do on anything Ravenwing after I got the wings done. I was actually worried that anything else I did would detract from the amazingness that is the paint job on the wings but it turned out well.  I did some random stuff with the stone bits on the Dark Talon and while they didn't turn out looking like the ones on the box, they match the scheme of the army so I'm happy with that.  There was some codex grey and a wash and some random drybrushing and stuff. It's all good.


I had some fun with the clear plastic and blue painters' tape!  I carefully applied the tape then burnished it along the frame with the back end of a brush, then trimmed away the portions I didn't require with a fresh #11 knife blade.  Then I sprayed with Chaos Black and sealed with clear flat.  Hey presto!  Kids - don't forget to mask the BACK of the plastic too or you've wasted your time.  I ordered a spare one from Bits and Kits in the UK.  It arrived broken, they won't reply to emails.  It's a Paypal claim now.  Buyer beware! I managed anyway and they're all complete.


One thing I don't like about highlighting fortress grey is that it shows up almost white with my camera!  The highlighting you see in the following picture is actually quite subtle but the light and the lens and the stuff makes it look like I just went along everything white a white paint stick.  The picture is actually supposed to show you the pilot glued in place with the cockpit detailed. 


I use Mithril Silver and coloured inks for the lights and buttons.  I like it. Then I used Weldbond carpenters glue to affix the glass.  You all know not to use plastic cement or superglue unless you like frosting and ruination. White glue works to an extent but Weldbond sticks like poo on a blanket. I ran a bead along the glass, put it in place.  Then I put a blob on that weird piece that goes over the glass at the back.  The nose piece I actually stuck in place with two part epoxy from the dollar store.  Costs me $1.25 (yeah, from a dollar store) for a tube and does the job very well thank you. 


So anyway, they're both done. I did my usual basing scheme and kept it simple. Lots of grass makes for a nice contrast to the flyer. I'm very happy with them and I'm looking forward to using them sometime soon! This weekend is a 40K tournament at Trumpeter's Salute in Burnaby BC.  I'm taking my 'nids because I'm not going to win.  I'll also be taking X Wing to play afterwards.  I need practice - I'd better go bullseye some Womp rats. 


Wednesday, March 13, 2013

Putting shelves in Ikea cabinets

I think that the IKEA's Detolf  glass cabinet is a staple of the hobbyist - lots of people I know have these inexpensive cabinets for displaying their the models they're most proud of.  I keep some of my Dark Angels models locked inside two cabinets for all to see and they look great!

What I don't really like about the Detolf is that it only has four surfaces inside for you to place your stuff on.  They're 15" apart which is good if you have a Reaver Titan or tall building or some such item.  If like me you're displaying bikes and Land Raiders and speeders - it leaves a lot of unused potential.

I got this idea from a posting on Dakka Dakka that I came across many moons ago and until recently when I found the hardware I needed, it had just been an item on the wish list.  But I found the hardware required.

You'll know if you own one of these cabinets that there is nowhere to mount additional shelves.  Well there is now.  You should go to the hardware store and buy some wire rope clips.  These things get clamped around the end of wire rope so that it doesn't fray and hurt people.

A pair of wire rope clips, earlier today
You can mail order them from Harbour Freight if you're so inclined.  I bought mine from Rona, a Canadian hardware chain.  To get the ones you need for this project you are looking for 5/16" or whatever the metric equivalent is I think you can get a clip as small as 6mm to fit but don't quote me on it. The ones I bought were 5/16"

All you need to do is clamp them around the inner frame of the cabinet.  Measure carefully, or use a level, or make adjustments as you go so that your glass doesn't wobble like a table with a short leg and you'll be fine. Install like this!


I just installed mine halfway between the stock shelves. Of course you can put them where you like.  Yes, that's my reflection.  Take care to ensure that your clamps are tightened quite securely.  They will bite into the plastic covering on the upright but still - it would suck a green weenie if the shelf fell onto the models underneath it. Oh my. 

The glass! The size that I had made up is 11 3/4" x 15 1/8".  You can convert that into mm if you're so inclined Google is great for that.   I ordered 1/4" shelf glass.  Cost me about $12 a sheet.  The wire rope clips cost me about $6 for a box of twelve, as I recall. You may like to add some soft foam tape or something to the clamp or the glass to cushion it slightly.  I will be when I go digging in my toolbox at work tomorrow.


And ta-da!  It works REALLY nicely if you're displaying transports, cavalry or infantry models.  You can easily double the shelf space you have for your armies by doing some running around and manual labour, without spending the money to buy another Detolf cabinet and without losing that additional square footage of floorspace. I'll be ordering a few more shelves soon, I think.  My son needs some for his cabinet with his favourite Lego models and his football trophies, and I think I'll be filling up a third cabinet with some Tyranids in the near future!


Thursday, March 7, 2013

IC podcast - March! Nephilim and Dark Talon pt 2

Not much of an update, but I wanted to mainly cover some airbrushing that I did on the fliers.  First, and most foolishly I basecoated them in Chaos Black. BAD MISTAKE.  I ended up with fuzzy models. I ONLY ever get this problem with Chaos Black, it's an awful paint in my opinion.
Luckily I was able to deal with the issue with some careful wetsanding, then re-primed the affected areas with P3's black primer.  It's far superior in my opinion.  It's a shame that I can't buy Osh primer up here in Canada. After I airbrushed, then did the usual thing where I have to get rid of the "suede texture" that the Tamiya paint leaves behind for me, it was better.  Then as with the bikes I painted the Boltgun Metal and the red (hurricane bolters on the Dark Talon) I did a wash through the airbrush with the thinned Badab Black.  I wasn't happy as there was a bit of a tide mark left, which hasn't happened before. Cleaned it up though, with some careful application of a 50/50 mix of black paint and black wash.

I wanted to get the wing panels to look something like they do on the box. Well, the Nephilim wings anyway.  I do like the look of the Dark Talon, but that is a lot of work. I tried to mask off the statuary bits on the fuselage bit it was a LOT of work, and there are - for me anyway - a lot of awkward spots and corners to get the masking tape trimmed around. I will brush paint that stuff as best I can.


I masked the wing panels with some 10mm Scotch autobody masking tape, and trimmed with a fresh #11 blade.  It took two evenings to get it done, but it was very tidy in the end.


Yes. Hilarious amounts of blue painter's tape.  The green stuff was from the dollar store and just STUNK. Didn't stick worth a damn either.  I was quite worried that when I took the tape off that the adhesive would affect the paint.  Didn't, though. 

I decided to try some of Vallejo's Model Air line for airbrushing the wing panels.  I bought the white and cerulean blue from Imperial Hobbies, a local hobby store that has a LARGE range of materials for all kinds of scale model, miniature, board game and card game hobbyist. They're also sponsors of Foodhammer too!
I also bought some of Vallejo's surface primer too. I'll have to play with it to see how it works for me.


I gave the wings a few thin layers of the white until it was pretty much opaque, then I switched to the blue, using a pre-shading technique to hit the rear edges of the wing panels. After that, I just dusted the wings with the white until it reached a point where there was a slight fade into the blue. 


Before I took the tape off, I didn't think it looked that great because I was just looking at a lot of white with a little bit of blue.  I had not considered the contrast that the black would give.  But when it came off - WOW! I'm very happy with it.  


As you can see, the wings look great. I'm hopeful that the rest of the painting goes just as well and each model just pops. That's as far as I am with them right now.  Taking a distraction break while I build a Dakkajet for the Waaagh! of Hamish, my 7 year old Warboss. I'll be putting the third twin linked Supashoota on it, but I need to find a way to Ork up the mounts for that third weapon.  Hopefully the Nephilim will be finished quite quickly.  I imagine the Dark Talon will take a little longer :-)

Tuesday, March 5, 2013

IC podcast - March! Nephilim and Dark Talon

My commitment for March was to build and paint the Nephilim Jetfighter, but since I also have a Dark Talon I thought that I would do them side by side. Not in single file to hide their numbers.

I built one Nephilim and two Dark Talons. But I only have one Dark Talon. Story goes thus; I started assembling my Nephilim and went through the first few steps of assembly. Then I went to grab part #3 from the sprue which is the cockpit control panel. Missing... I looked around, POSITIVE that I hadn't clipped it and dropped it.

The part that was missing is the one you see in front of the pilot. Now not missing.

So as I said in a previous posting; after I tore my hobby space apart I convinced myself that it was in fact missing from the kit. I called my local GW, gave them a heads up and went in the following evening. I was sure they thought I'd just lost the part, but true to their customer service policy they wrote off a new kit and gave me the missing part. I happily completed the kit!

The Dark Talon assembly was going VERY quickly, and I almost had it done in an afternoon. Almost. I was almost finished the assembly when I noticed a fault in one half of the fuselage.

Wife suggested that maybe an extra gun could poke through the hole. 
So off I went with an almost completed kit and showed them. The member of staff tore open a brand new kit so that we may inspect the entire kit together. The look on his face was priceless. The part that was missing from the first kit was also missing from this kit! Because I didn't want to be a complete ass, I pried the control panel from the model I was returning and took the replacement kit with me. Five hours later I had the kit fully assembled without faults. Work the next day was not fun. So tired.

As with the Darkshrouds, I magnetised the pilot for easy in-place assembly.  He's out and in the box to make it easier to paint the cockpit.  Nick The Grip suggested that I should not merely magnetise the torso in case it came loose after the canopy was glued on.  Bonus attraction - it can be a game where you shake the model in an attempt to get the torso back in position! But I said no - it will be glued.

Oh, I have no idea why because I'll probably lose the bloody thing but I magnetised the Statis Bomb that goes on the Dark Talon. Installing magnets like this!


Pretty easy, and I didn't really need to put any putty on the back for support, it's not like there is any heavy weight on it.  I did buy some very short drill bits at GameStars, my FLGS.  1/16" High Speed Steel bits, and they're about 1.5" long! A product of Primal Horizon.

Magnetising the bomb was a little fiddlier.  The small tab was too small for a magnet, so I drilled in and buried a piece of paperclip in there.  Just enough for the magnet in the fuselage to grab. Nice.

So there they are.  Ready for paint.  I also magnetised the megabolter/lascannon assembly for the Nephilim - there is a spot where a 1/16" magnet will fit inside the recess at the top. Next - PAINT! Huzzah!


Wednesday, February 20, 2013

February - Chaplain Dreadnought, part 2

So there's not much to tell really - it's complete!

There's no need for a stroke by stroke account of the paintwork since the black is pretty much the same as the Ravenwing, and the base was done using the same materials I used for the Ravenwing bases.

I played around with some of the new GW metallics for the bronze and copper areas.  There's too much gold being used in 40K.  I like the patina of a red metal, so I went with that.  The cooling tubes on the plasma gun were painted in using Hawk Turquoise up to Ceramite White.  That new white really covers well but it's too artificial - too stark for my taste for general use.

I left the mud shiny on the base.  The bubbles were done using Non-Pareils!

I'm quite satisfied with how it turned out.  And here's a few pictures for you to enjoy.


Next up... I dunno. Haven't decided yet.  I'm working on cleaning and prepping the dreadnought drop pod. Maybe at the same time I shall work on the flyers.

In the meantime, here is the army list that I committed to.


HQ: Belial (1#, 190 pts)
1 Belial, 190 pts

Elite: Deathwing Knights (5#, 235 pts)
4 Deathwing Knights, 235 pts = 4 * 46 (base cost 46) + Knight Master 51

JANUARY COMMITMENT COMPLETE: Fast Attack: Ravenwing Attack Squadron (8#, 331 pts)
1 Ravenwing Attack Squadron, 0 pts
5 Ravenwing Biker, 181 pts = 5 * 27 (base cost 27) + Flamer x1 5 + Plasma gun x1 15 + Ravenwing Sergeant 41
1 Ravenwing Sergeant, 15 pts = (base cost 0 + Upgrade to Veteran Sergeant 10) + Melta Bombs 5
1 Ravenwing Attack Bike, 55 pts = (base cost 45) + Multi-melta 10
1 Land Speeder, 80 pts = (base cost 50) + Assault Cannon 30

Troops: Deathwing Terminator Squad (5#, 245 pts)
4 Deathwing Terminator Squad, 245 pts = 4 * 44 (base cost 44) + Chainfist x1 5 + Assault Cannon x1 20 + Deathwing Terminator Sergeant 44

Troops: Deathwing Terminator Squad (5#, 245 pts)
4 Deathwing Terminator Squad, 245 pts = 4 * 44 (base cost 44) + Chainfist x1 5 + Assault Cannon x1 20 + Deathwing Terminator Sergeant 44

Heavy Support: Land Speeder Vengeance (1#, 160 pts)
1 Land Speeder Vengeance, 160 pts = (base cost 140) + Assault Cannon 20

Fast Attack: Nephilim Jetfighter (1#, 180 pts)
1 Nephilim Jetfighter, 180 pts

FEBRUARY COMMITMENT UNDERWAY - Elite: 1 Chaplain Dreadnought (IA)
1 Chaplain Dreadnought (IA) - Storm Bolter; Dreadnought CCW; Dreadnought CCW; 

Dedicated Transport: 1 Lucius Pattern Dreadnought Drop Pod (IA)
1 Lucius Pattern Dreadnought Drop Pod (IA)

Total Roster Cost: 1841

Sorry, I couldn't get the other nine points from anywhere but I'll be painting more models than listed. I promise! For instance, when I work on the two Terminator Troop choices, I will be painting a Deathwing Champion to go with my existing command squad. I will also be building and painting a few of the fat kids with Cyclone Missile Launchers and lightning claws. There will be six more Knights painted to go with the five in the commitment. MAN, I want to put eight of them in a Spartan with Belial and Asmodai.

The Land Speeder Vengeance will have its Darkshroud pieces painted at the same time. As will its twin, so that month's commitment will be a twofer! I could say the same for the Nephilim as I will be painting the Dark Talon in the same month.

I couldn't get them into the list but I have the Ravenwing command squad and six black knights to do also. I'm glad there's a banner in each box since that gives me three tries at not f'n it up

Tuesday, January 29, 2013

IC's hobby challenge, February - Chaplain Dreadnought


As I've mentioned I'm working on building more Ravenwing so that I can do a lot of basecoating at the same time.  I have built two Deathshroud/Vengeance kits in the last week and fully magnetised them.  You can read about how I went about that in the previous blog entry.

Aww, yeaaahhhh.

THOSE are not my commitment for February. Well, not the main one.  My building commitment for February is to get those built as well as a Nephilim with magnetised nosecone weaponry and a Dark Talon with magnetised wing weaponry.  There will be bloggage on the builds After that is done, I will paint my Chaplain Dreadnought.


The Chaplain was built in a moment of hobby ADD in mid January.  Nice model.  I was frustrated but not surprised that the spines on the Iron Halo are all wonky, so I will have to use a hairdryer to try and soften them up for straightening. My OTHER frustration is that the pegs on the side of the sarcophagus are a LOT smaller than the holes in the weapon arms; the arms just fall right off.

I first tried to just make a good friction fit by stuffing grey stuff into the holes then displacing the excess by pushing the arm onto the dreadnought.  It worked to an extent but I wasn't COMPLETELY satisfied.  So I dug out the trust 1/16" x 1/16" cylindrical magnets from KJ Magnetics and went at it.  I magnetised the left arm too rather than just gluing it in place.  That will help to keep it from being damaged in transit.

Since I'm a mechanic, you'll usually see hands that I can't always get all the way clean!

The model has two close combat weapon arms, and a plasma cannon as a swap-out depending on the desired application.  I will be putting him in a Lucius pattern drop pod that will come in a lovely shade of Deathwing. With two CCW arms he'll be able to perform some righteous topiary on the enemy upon his arrival :)


I would have loved to put a heavy flamer on the sarcophagus but apparently it's only available with the Grey Knight venerable dreadnought kit. Oh well.  I put the storm bolter on and if someone gets all bitchy about WYSIWYG over a tiny storm bolter that you can't see from three feet then they're not worth having a game with. YEAH!


The base is from Mr. Dandy. I'll most likely flock it and put mud holes in it too. It's held in place with paper clips for now, as is the torso - it will be permanently pinned to the legs after painting is complete.

Saturday, January 26, 2013

Darkshrouds and Vengeances and magnets - OH MY!

image © GW
Right! Time to get my money's worth!  Well, I mean - $80 Canadian (yes, I hear you gasp!) IS a bit much for this kit (not that I paid that).  If you want one of each type of these speeders for occasional use then it's a stretch to afford both.

I like the look of the kit, I really do.  There's those who (me included) who have dubbed it The Disco Speeder, since it looks like a flying DJ booth (and those Necrons on the Command Barge DON'T look like they're taking requests at a wedding reception?).  I actually thought for a few minutes of putting Lego motorcycle helmets on the two in front and having them represent Daft Punk in Tron Legacy, and put a Mickey Mouse head on the turret gunner to represent Deadmau5.  But I didn't do that, because that wouldn't match the clean look of the rest of my army and WOULD be a waste of an $80 kit.  I've finished one, and I'll be doing the other one over the course of this week.

I started with one of the flying bases that I bought from S6 Engineering. A shame that they decided to close their doors because I really do like these bases.  Alas, no more.  I'll have to find another magnetic flying stand vendor. I gather that Back To Base-ix are okay.


This is the assembled flying stand.  Yes, I scratched it. Bugger. I can probably fix that with some Future, I think. Some filing had to be done as the upright didn't fit exactly in the slot in the base - that's when I scratched it.  The oval on the top glues to the bottom of the model. There's a magnet in the oval and a magnet in the upright.  A cross shape mates them in such a way as to prevent the model rotating on the stand. 


Oval goes here.  It's not a level surface so I had to cut a small piece of plasticard to level it out.  The magnet has to be recessed so I had to drill into the body of the speeder to accept the 1/4" magnet. That's a big drill bit to turn by hand, once you've worked your way up to that diameter. There is some epoxy clay to reinforce the magnet on the inside of the model. 


Ta-da.  There is a widget that's supposed to glue to the piece coming down from the bottom of the model, that's just behind the stand.  The stand interferes with it so I left it off.  Well, that's one less skull that I have to paint anyway...

Since the body of the speeder is pretty much what it will be, I won't go over the building of that - you can read about it in the instructions you'll get with the kit!  I will go over the important bits, and some stuff that I did just to make life easier for me when I paint the thing.  The main turret first!


Assemble the weapons from the Plasma Storm Battery and carefully drill 1/16" holes in the mounting pegs.  You can get 1/16" x 1/16" cylindrical magnets from your magnet supplier.  I like KJ Magnetics, myself.  Do this for each of the two weapons.


This is the donut bit that glues to the side of the turret.  The peg on the gun is quite a snug fit so it won't flop around when you install it. The magnet keeps it in place.


Glue the donut in place, and carefully drill a 1/8" hole, centred there.  The hole in the donut is 1/8" so use the correct bit.  Be careful you don't make the donut hole bigger or the gun WILL flop around. Underneath the turret, you'll see that it's hollow, and you can watch the drill bit break through.  You should put some green stuff or grey stuff or whatever stuff in that hollow to support the magnet.  Push it in part way (apply a bit of glue to the back of the magnet, it will adhere to the epoxy clay in the hollow as it contacts), then use the gun peg to push it in the rest of the way.  That way it will find its depth.  If you push it in too far, you won't get the magnetic attraction you need. Use the peg on the gun and it'll work perfectly.  Do this for the other side and you're golden.


This is the piece that goes across the front of the turret for the "optional sensor array", as it is described in the instructions.  I installed it upside down purposefully, so that it would not stop me putting the Icon Of Old Caliban in place (hereafter known as The Icon).  Trim it a little - you can see where I scored it.


Dry fit it with the icon in place before you commit to glue. Do that later. You can see the moulded line in the front of the turret - that's where it should line up. So far, so good!

And there you have it! Optional Sensor Array and everything.  The guns will sit a TAD askew since they're not glued in place but on the tabletop who'll really give a Jokaero's arse?  The donut is a good friction fit, and the magnets are strong enough to hold them in place.  Yes, I know the gunner isn't there. More on that later!


This is the clip that you would glue to the turret were you building the Darkshroud only.  In the instruction book they're numbered 41 and 42, step 17. Where the 1/16" magnet has gone in, the piece will start with a slight depression in it - just open it up with a drill bit and you can push the magnet in place, it should stay put. Do this for both sides of the turret. You'll see in the right hand picture that it just snaps into place in the turret. 


Assemble the rest of The Icon - as much as is required for a test fit. The bracing for the back of the Icon, parts 45 and 46, should glue to the icon and not the turret of course. When installing and removing The Icon, care should be taken so that you don't snap it.  You need to slightly bend the cross piece so that the dimples on those clips go into the holes. Just be careful, you'll figure it out :)

I am Caliban (And So Can You!)


As an aside - a word of caution.  When glueing those tiny pieces into the side of the pulpit, DON'T DROP THEM! One of the rows of skulls slipped from my fingers, hit the garbage can under my desk and I never saw it again.  Minutes of searching with a light under my desk bore no fruit.  I made another set using Insta-Mold and some Grey Stuff.  The replication isn't exact - you can see that the copies are smaller.  Doesn't matter to me, at least I have them. 


I decided to magnetise the Pulpit Gunner too!  You can see I installed a magnet in the top of his bottom(?!) and installed its mate in the bottom of his top!  


Clipping the gunner in place helped me to glue the arms in at the correct level so that the assault cannon and heavy bolter rode the support rail correctly. Once the arms had dried in I removed the torso and glued on the pauldrons.  Then glued the gun to the cross-piece being held in the hands.  


I had spare bodies lying around from the Rhino kits and so I used the back and arms from one of those sprues. I set the arms at the right level for the Heavy Bolter, then removed him and glued the Pauldrons and bolter in place, setting him back down in situ while the glue dried.


I did the same for the pulpit gunner.  It was a tight fit to get him in and out while setting the arms in the correct position - I ended up being very careful with a pair of needle-nose pliers.  The same for the pilot.  I would advise extra care when glueing the pilot's arms on as they are separate and need some support while drying.  Do one at a time and have patience while the glue sets.  I use Plastruct Plastic Weld for all of my plastic assembly.  I've found it works okay with small pieces of Finecast too.  I just magnetised the pilot and turret gunner so that I can pop them out and in while painting.  I will probably glue them in place after painting is complete. 


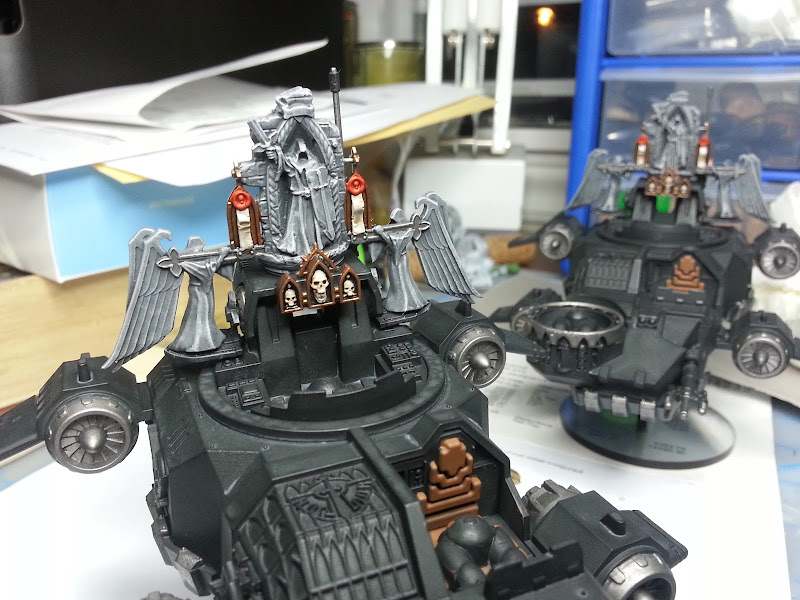
And so there you have it - another photo with a cluttered background showing you the finished build of this model. I have one more of these kits which I will no doubt complete more quickly, then it will be on to the Talon and the Nephilim.  I will be building one of each. Hopefully my Ravenwing Command Squad arrive soon so that I can also build those.  I will have a lot of black models to prime and basecoat with the airbrush.  All part of the Independent Characters 2013 Hobby Progress Challenge! My progress as you know is being mirrored in this blog.  This entry is an extra, but I will mirror it in there when it is time.  You can see my progress thread at this link - it's the same content as this page for the most part but you can see the discussion of my progress from my peers on the forum.