Tuesday, April 23, 2013

IC Podcast challenge, April. Landspeeder Vengeance. And a Darkshroud.

Previously on "For The Limey"...  you'll remember that I built and magnetised (think I'm hungry, I almost typed baconised) two Darkshroud/Vengeance kits. This month I painted them, and I got them finished about this time last week too, so I'm already ahead of the game for my May/June/July commitments which are all Deathwing thanks to some batch airbrushing today.


Not much to tell on them really - I used the same techniques I used on the other Ravenwing models. Block in the metallics and reds then wash with the airbrush. The statuary bits were easy to paint.  Some codex grey, badab black and a fortress grey drybrush was applied to the stonework.  The bronze/gold sort of bits were a Balthasar Gold base (love that paint. It's so hot right now) with an Earthshade wash and a Shining Gold highlight. Easy. One of these days I'll get around to trying the Golden Brown metallic wash from Secret Weapon - this would have been perfect.  Ah hindsight, you mad thing.


As usual I used Mithril Silver and inks for the buttons.  Shiny! P3 CoaL Black for screens.


The stained glass was a second try success.  I originally went for a white/silver mix for the base with inks on the top but it looked like this. Which was crap. 


It didn't work as it suggested there was light on the inside making the colours of the glass stand out, which just wasn't working for me.  So I went over with white and got the Hawk Turquoise out and mixed with some other stuff that I just can't remember.  I couldn't reproduce it if I tried!  I'm happier with this. Sorry for the dark picture


I didn't paint the glass next to the pilot - it was too fiddly to get in there so it's just black. Meh. And then I did the rest of the work and clearcoated them and now they look like this. I look forward to playing with them!


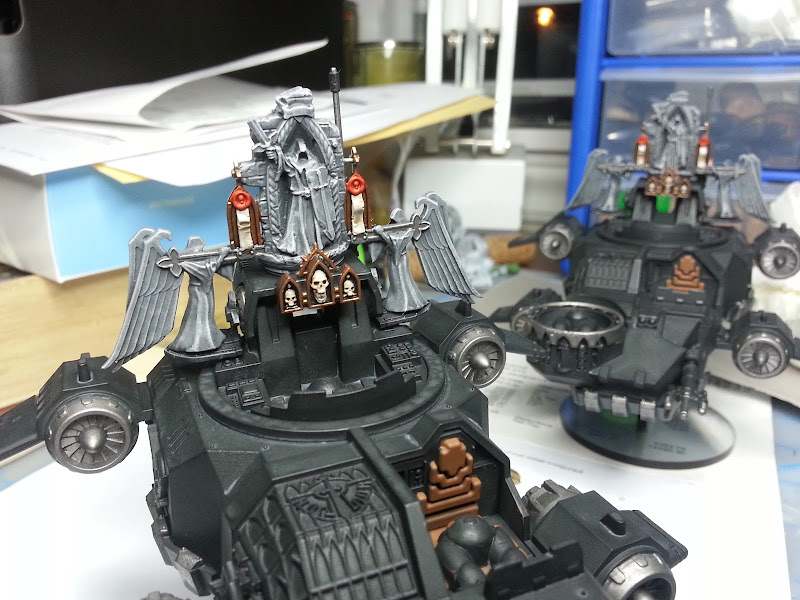
My May commitment is just the new Belial model.  I cut his sandwich board off as I think it's rather impractical. See you next time. 


Friday, April 5, 2013

IC podcast - March! Nephilim and Dark Talon pt 3

It's been a month since I posted - blame it on my Dark Passenger.  Oh my god this new keyboard's awful.  It's like a chimpanzee trying to text with his lips.

So anyway, I got the Nephilim finished.  I actually finished about three weeks ago but I procrastinated on the postings until I got the Dark Talon finished and then it was all OH! SHINY! with X-Wing and a Dakkajet for WAAAGH! Hamish, and some gargoyles for Hive Fleet Limey (dead blog, don't go there).

I progressed through the usual painting that I do on anything Ravenwing after I got the wings done. I was actually worried that anything else I did would detract from the amazingness that is the paint job on the wings but it turned out well.  I did some random stuff with the stone bits on the Dark Talon and while they didn't turn out looking like the ones on the box, they match the scheme of the army so I'm happy with that.  There was some codex grey and a wash and some random drybrushing and stuff. It's all good.


I had some fun with the clear plastic and blue painters' tape!  I carefully applied the tape then burnished it along the frame with the back end of a brush, then trimmed away the portions I didn't require with a fresh #11 knife blade.  Then I sprayed with Chaos Black and sealed with clear flat.  Hey presto!  Kids - don't forget to mask the BACK of the plastic too or you've wasted your time.  I ordered a spare one from Bits and Kits in the UK.  It arrived broken, they won't reply to emails.  It's a Paypal claim now.  Buyer beware! I managed anyway and they're all complete.


One thing I don't like about highlighting fortress grey is that it shows up almost white with my camera!  The highlighting you see in the following picture is actually quite subtle but the light and the lens and the stuff makes it look like I just went along everything white a white paint stick.  The picture is actually supposed to show you the pilot glued in place with the cockpit detailed. 


I use Mithril Silver and coloured inks for the lights and buttons.  I like it. Then I used Weldbond carpenters glue to affix the glass.  You all know not to use plastic cement or superglue unless you like frosting and ruination. White glue works to an extent but Weldbond sticks like poo on a blanket. I ran a bead along the glass, put it in place.  Then I put a blob on that weird piece that goes over the glass at the back.  The nose piece I actually stuck in place with two part epoxy from the dollar store.  Costs me $1.25 (yeah, from a dollar store) for a tube and does the job very well thank you. 


So anyway, they're both done. I did my usual basing scheme and kept it simple. Lots of grass makes for a nice contrast to the flyer. I'm very happy with them and I'm looking forward to using them sometime soon! This weekend is a 40K tournament at Trumpeter's Salute in Burnaby BC.  I'm taking my 'nids because I'm not going to win.  I'll also be taking X Wing to play afterwards.  I need practice - I'd better go bullseye some Womp rats. 


Wednesday, March 13, 2013

Putting shelves in Ikea cabinets

I think that the IKEA's Detolf  glass cabinet is a staple of the hobbyist - lots of people I know have these inexpensive cabinets for displaying their the models they're most proud of.  I keep some of my Dark Angels models locked inside two cabinets for all to see and they look great!

What I don't really like about the Detolf is that it only has four surfaces inside for you to place your stuff on.  They're 15" apart which is good if you have a Reaver Titan or tall building or some such item.  If like me you're displaying bikes and Land Raiders and speeders - it leaves a lot of unused potential.

I got this idea from a posting on Dakka Dakka that I came across many moons ago and until recently when I found the hardware I needed, it had just been an item on the wish list.  But I found the hardware required.

You'll know if you own one of these cabinets that there is nowhere to mount additional shelves.  Well there is now.  You should go to the hardware store and buy some wire rope clips.  These things get clamped around the end of wire rope so that it doesn't fray and hurt people.

A pair of wire rope clips, earlier today
You can mail order them from Harbour Freight if you're so inclined.  I bought mine from Rona, a Canadian hardware chain.  To get the ones you need for this project you are looking for 5/16" or whatever the metric equivalent is I think you can get a clip as small as 6mm to fit but don't quote me on it. The ones I bought were 5/16"

All you need to do is clamp them around the inner frame of the cabinet.  Measure carefully, or use a level, or make adjustments as you go so that your glass doesn't wobble like a table with a short leg and you'll be fine. Install like this!


I just installed mine halfway between the stock shelves. Of course you can put them where you like.  Yes, that's my reflection.  Take care to ensure that your clamps are tightened quite securely.  They will bite into the plastic covering on the upright but still - it would suck a green weenie if the shelf fell onto the models underneath it. Oh my. 

The glass! The size that I had made up is 11 3/4" x 15 1/8".  You can convert that into mm if you're so inclined Google is great for that.   I ordered 1/4" shelf glass.  Cost me about $12 a sheet.  The wire rope clips cost me about $6 for a box of twelve, as I recall. You may like to add some soft foam tape or something to the clamp or the glass to cushion it slightly.  I will be when I go digging in my toolbox at work tomorrow.


And ta-da!  It works REALLY nicely if you're displaying transports, cavalry or infantry models.  You can easily double the shelf space you have for your armies by doing some running around and manual labour, without spending the money to buy another Detolf cabinet and without losing that additional square footage of floorspace. I'll be ordering a few more shelves soon, I think.  My son needs some for his cabinet with his favourite Lego models and his football trophies, and I think I'll be filling up a third cabinet with some Tyranids in the near future!